Google Camera is famous for the advanced functions and features it gives us on the smartphone. Thanks to the Android community, everyone can now easily get it without owning a Pixel phone. In this short guide, we have collected the most useful GCam settings that greatly improve the quality of our photos and that you should know about.
As we analyzed in a previous guide of GCam: How to Get Google Camera on All Mobiles, it is now an easy task to download Google Camera Mod on most mobiles, regardless of their features. In this way, we get software with advanced functions that noticeably improves the quality of the photo, both in day shots and in night shots.
So, let’s look at the most useful settings that we need to know. We have to mention that for the needs of the guide we used Google Camera v8.4.6 on Xiaomi Redmi with Android 12. If you have an older version, there may be some differences and you may see the same setting with a different indicator, or you may not see it at all.
Quick Selfie or Video Shortcuts
In response to Apple’s 3D Touch, Google also brought instant access to downloads. More specifically, long-pressing the app icon will display shortcuts for selfies and videos.

Depending on our mobile, if we long press on this app icon, we may also be able to place them on the home screen as extra shortcuts.
Face Retouching
When we take selfies or portrait photos, activating the retouch will improve the result of the shot. More specifically, it will adjust under-eye tone, eye brightness, and skin texture.
We simply go to Selfie or Portrait mode and press the settings arrow at the top. Then, we will see the Face Retouch option on the 3rd point, where we choose the desired retouch (Subtle or Smooth).

As the face retouching results only show up in the final photo, we might have to experiment a bit with these two options, taking a few selfies if there’s no other face.
Change Photo Resolution
Google Camera allows us to take photos in max, full, or medium resolution. The latter helps us to save storage space on the mobile.
To change the resolution, go to Settings > More settings > camera photo resolution and select the relevant one.

Button Toggles – Gestures
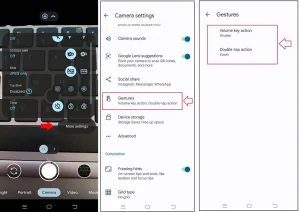
By default, both volume buttons can be used as shutter buttons to take photos. However, we can map the buttons for zoom, camera switching, or volume.
The relevant setting can be found in Settings > More settings > Gestures (Volume key action and double-tap action).
Quick Sharing
Google Camera allows us to share the photos and videos we take very quickly on social media. Immediately after downloading, we will see a small arrow appear to the right of the menu.
We can select up to three apps at a time through Settings > More settings > Social share.

Enable RAW Photos
RAW images are very useful for professionals as they have full control over image processing on a computer. Google Camera allows us to take advantage of them and save them in a separate folder on the mobile.
To enable RAW images, go to Settings > More settings > Advanced settings, and select the RAW+JPEG Control now this will be available in the setting, you can select as required (RAW or JPEG)

Disable HDR+
By default, Google Camera has HDR+ enabled to deliver better results in shots. However, this option is not always necessary in all cases. Especially if we don’t have a high-end mobile phone, it’s a good idea to turn it off.
The reason is that HDR+ requires extra processing time, as it forces the phone to take more photos and process them to adjust dynamic range, colors, and contrast. Therefore, on mobile with average features, we may face annoying delays and not-so-pleasant experiences.
To enable the HDR+ option, go to Settings > More settings > Advanced settings, and select the HDR+ control, now it will be available in setting where you can select as required (No HDR+, HDR+, or HDR + Enhance)

HDR+ Enhanced setting
On the other hand, there are not a few who consider that HDR+ Enhanced in Google Camera helps a lot if we have a good Android phone. It’s similar to HDR+ but takes darker, brighter, and more photos to blend.
In general, this is a mode that brings colors to life and dramatically improves photos in difficult lighting conditions, be it bright sunlight or night shooting.

The secret here is that we need to set it to 24 or 36 frames by pressing the “+” and “-” that are available just under the HDR+ control. And here we need to experiment a bit with these frames
Top Shot (Best shots of the day)
Google Camera enables us to take better daytime shots where we can capture more details by choosing one of the two modes available (Auto / Active).
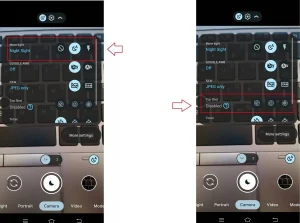
The best shot is combined with the “More Light” function at the top and will only be available when we have the flash, social media depth feature, night sight, and selfie illumination on, and HDR+ Enhanced active is off.
Night Sight – Auto White Balance
Night sight is one of the most exciting features of the app as it takes excellent shots even in very low-light environments. We can say that users generally prefer GCam for this feature.
So, for even better results, we must have AWB (Auto White Balance) active, a Google technology that corrects and improves colors in night shots, and more. As a result, we get much brighter and clearer photos in low light.
The settings here are the same regardless of the GCam version we are using. Go to setting and select “Night sight” from the more light option tab.
Of course, we can always turn on Astrophotography right above if we’re going to shoot the starry sky.
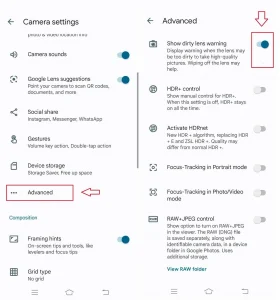
Dirty Lens Warning
Sometimes when we take photos, the camera lens may not be clear, resulting in poor quality photos. Fortunately, Google Camera has a feature that notifies us if the camera lens is dirty.
We find the relevant function in Settings > More settings > Advanced settings > Show dirty lens warning.
Quick View / Edit / Toggle
By tapping on the icon next to the shutter in the lower part, we can always take a look at our latest photos or videos without leaving the application.
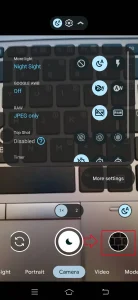
At the same time, we can edit them on the spot, but also directly use Google Lens, the AI-based image search tool.
In addition, it may be useful to remember that if we press and hold the shutter button of the camera, we can start recording video quickly without going to the adjacent Video tab.
How Many Photos/Videos Can We Take?
Google Camera tells us how many photos or minutes of video we can take on our mobile. It calculates this based on available storage space.
The relevant function can be found in Settings > More settings > Device storage.

Here we can optimize the storage space by activating the relevant savings indicator, or by choosing one of the following indicators, depending on our needs.
Wrapping Up:
In this short read, we try our best to cover maximum features but GCam has a wide range of options that can’t be covered in one article. However, if you have any questions please leave a comment in our comment section or mail us, we will respond as quickly as possible.
